Showing posts with label Apple. Show all posts

Tuesday, December 31, 2013

Reset your Mac's EFI Extensible Firmware Interface) password

So you're locked out of your mac because a firmware password has been set and you forgot it. Don't worry, there is hope and you have several options:

Firmware Password Utility: 
  • Boot from OS X Recovery (Time Machine, USB, internet recovery, etc.) 
  • Go to your Utilities Menu and choose Firmware Password Utility to either reset your password or to turn it off. 
Firmware Password Utility

 EFI Reset Tool (I also take no responsibility for any illegal use nor do I condone this). 
Reset PRAM/NVRAM three times:
  • Add or remove a stick of ram. Obviously if you have one stick in, add one and if you have two in remove one. 
  • Power on the mac and immediately press and hold command-option-P-R. 
  • The system will restart with the ‘bong noise’, allow it to do this 3 times. On the third ‘bong’ you can let go of the keys. 
  • The machine will now boot with a cleared password and reset PRAM/NVRAM. 
  • You can shut down the machine and replace the original ram configuration. 
Hold in the power button:
  • Press the power button for ten seconds until the front indicator flashes. 
  • Keep holding the button till the mac starts up; this way your Mac EFI is reset. This will help in a lot of problems. 
If nothing works, I am afraid you will need to go to the Apple store and show proof of purchase before they reset the EFI for free. Here is a little more information on this topic.

Sunday, June 30, 2013

Gray screen instead of login screen

I was hoping you could help with my MacBook Pro issues. First, my left fan was grinding so of course i blew out the fan (they were dusty). The laptop was also getting hot. After login I would also be presented with a white screen and no login screen would show.

I did every troubleshooting technique possible from:

1. repairing permissions - all fixed

2. resetting PRAM - was advised to release after 7 chimes

3. ran Techtool Pro 6 - no problems, not even video (card, memory... nothing)

4. ran Onyx (kinda like CCleaner). I cleaned EVERYTHING

5. took to Apple Store and they ran diagnostics and everything checked out. The fans even checked out

6. I was advised that my Hard drive was failing, but the SMART passed

7. As a last resort, I backed up, erased and reinstalled Snow Leopard thinking it may just be a something I installed (driver or something) causing conflicts. I'm still getting the white screen.

This is the funny thing, I safe boot the laptop and I get the login screen and everything is hunky dory. This happens every time I safe boot (no white screen)

I have done extensive research and tried everything presented to me to no avail.

Tuesday, September 25, 2012

Turn off startup programs to speed things up

If you have too many programs configured to startup at boot, this may slow down your computer.  This is especially true if you keep installing programs over the years.  Disabling startup programs can also help you isolate software conflicts you may be having.  I show you in this post how to disable these.

First, I'll show you how to do this on a Mac:


  1. Go to the Apple Menu and choose System Preferences... (you can also click on System Preferences in the Dock, if it's there)
     2. In the System section, Click on Users and Groups

     3. Click on the Login Items tab and highlight the unwanted programs and click the minus button.


In Windows, follow the following instructions:

     1. Click on Start
     2. From the Start Menu Options choose Run
     3. Type “msconfig” without quotes and click okay. This will bring up System Configuration Utility
     4. System Configuration Utility >> Click the tab called Startup
     6. Now you can uncheck any programs that you do not want running upon startup
     7. Once you are done unchecking Click Okay and you will be prompted to restart your computer


Click this link to access a page to help you figure out what startup programs are necessary and not necessary.

Force key repeat

Staring with Lion Apple added a new "feature" to give you alternative characters when you hold down certain keys (this is equivalent to holding down the option key in previous versions of the OS).  To force key repeat, type in the following command in Terminal:


defaults write -g ApplePressAndHoldEnabled -bool false

You can also achieve this behavior via the Secrets Preference Pane, as illustrated below.

Tuesday, August 28, 2012

Constant Google popups

If you constantly get a popup that says, "To view this page, you must log in to this area on mail.google.com:443:" when logging into your Google account, follow the instructions below the illustration
Click on the screen shot to enlarge

open Keychain Access (Applications => Utilities => Keychain Access) Select Passwords on the left.
Delete your Gmail keychain.  Also, if you have any Google related extensions (Google Toolbar, Google Notifier, etc) and your password gets deleted, you may get this popup.

If you not want this behavior, delete your Google add-on.  If you have the Google toolbar installed, open your preferences in Safari and click on Extensions.  Click on Apps on the left and uncheck Gmail


Monday, August 27, 2012

Completely reset Safari to fix problems

If you are constantly having problems with Safari hanging or it just refuses to quit, as was in my case, you'll want to do a FULL reset.  You will be deleting a bunch of preference files, but don't worry, Safari will recreate all these files.  Just follow the instructions below:

Open Terminal - follow this path: Applications => Utilities => Terminal  and paste the commands following the screen shot then hit return.  These commands will save your Safari folder with a date stamp on your Desktop and delete several files.


mv ~/Library/Safari ~/Desktop/Safari-`date +%Y%m%d%H%M%S`; \
rm -Rf ~/Library/Caches/Apple\ -\ Safari\ -\ Safari\ Extensions\ Gallery; \
rm -Rf ~/Library/Caches/Metadata/Safari; \
rm -Rf ~/Library/Caches/com.apple.Safari; \
rm -Rf ~/Library/Caches/com.apple.WebKit.PluginProcess; \
rm -Rf ~/Library/Cookies/Cookies.binarycookies; \
rm -Rf ~/Library/Preferences/Apple\ -\ Safari\ -\ Safari\ Extensions\ Gallery; \
rm -Rf ~/Library/Preferences/com.apple.Safari.LSSharedFileList.plist; \
rm -Rf ~/Library/Preferences/com.apple.Safari.RSS.plist; \
rm -Rf ~/Library/Preferences/com.apple.Safari.plist; \
rm -Rf ~/Library/Preferences/com.apple.WebFoundation.plist; \
rm -Rf ~/Library/Preferences/com.apple.WebKit.PluginHost.plist; \
rm -Rf ~/Library/Preferences/com.apple.WebKit.PluginProcess.plist; \
rm -Rf ~/Library/PubSub/Database; \
rm -Rf ~/Library/Saved\ Application\ State/com.apple.Safari.savedState

Monday, August 20, 2012

Icons galore!

If you are looking for the perfect icon for your Mac then look no further than your CoreServices folder.  This folder holds every imaginable icon your Mac has to offer, and depending on which version Max OS X you're using, you will be able find 2000+!  My folder, for example, has 2,370 icons!  To get to all these icons all you have to do is:

  • launch Preview
  • Go to your MacintoshHD folder (this is your startup drive and you may have renamed it).
  • Double-click the System folder
  • Double-click the LIbrary folder
  • Now look for the CoreServices folder

  • Now drag that folder on top of the Preview icon that's on the Dock

As you can see, you may get presented with 2,300+ icons, which is great for getting the perfect icon.  Now you'll want to select the icon by enabling the Edit Toolbar, if it's not already.
  • click on your View menu
  • Now click on Show Edit Toolbar

Now select any selection tool you wish, Lasso Selection, for example on the left side of the Edit toolbar.
  • Now drag your selection tool around the icon.  

Wednesday, August 15, 2012

Mac compatibility

I recently came across a great site for checking for compatibility of applications for new releases of the Mac operating system (Lion, Mountain Lion to even future versions).  The site in question is RoaringApps and recently added Devices section, in which you can check which of your (many) Apple computers will run the latest versions of OS X and iOS.

You can also update your Mac's firmware to make it more compatible and functional by clicking here.  My laptop's firmware, for instance, would be here.  Another example would be an an iMac I recently upgraded.

Microsoft Windows has an equivalent in a software download and you can download it here

Tuesday, August 14, 2012

Easily find your Mac's model number

Last week I was asked if there was an easier way to find your Mac's model.  There is, in fact, a very easy way.  Just follow these simple instructions:


  • Locate the Apple Menu and option click About This Mac so it reads System Information...
  • In the Hardware section, look for Model Identifier.
  • Head on over to everymac.com and scroll down and make sure the By Identifier tab is open and click on Model Identifier.
  • Now look for your Identifier in the list.  My iMac, for example, would be iMac12,1.  A friend I know has a laptop with an identifier of MacBookPro2,2
Note: you may have a version of MacOS X that has System Profiler instead of System Information.

You can also download an application equivalent of EveryMac.com called MacTracker. 

If you are on a Windows system, the utility you want is msinfo32.  Just click the Start menu and immediately type msinfo32.  After you press return, the utility will show up


Saturday, August 11, 2012

Every Mac spec

There is a website called everymac.com that lists all the specifications of every mac ever made. It also has specs to every iPod, iPhone, iPad and Mac clone in the world, with technical, configuration, and pricing info. Get specs on every Mac, answer your Mac questions, compare Macs side-by-side, lookup Macs, and more!

Wednesday, June 27, 2012


Lion doesn't come on any physical media.  Instead, you have download it from Apple's servers from the Apple store.  What if you bought a Mac with Lion already installed and you desperately need the install DVD because your hard drive got hosed.  The following will give you instructions on how to burn your own install DVD.


  1. Download Lion from the Mac App Store. The installer should show up in your Applications folder.
  2. Right-click on the installer and hit "Show Package Contents". Navigate to Contents > SharedSupport and look for a file called "InstallESD.dmg".
  3. Open up Disk Utility and drag the DMG file into the left-hand sidebar. If you're burning it to a DVD, insert your DVD, select the disk image in the sidebar, and hit the "Burn" button. Skip down to the last step to use it.
  4. If you want to burn Lion to a USB flash drive, plug it in and click on it in the left-hand sidebar in Disk Utility. Go to the Partition tab and select "1 Partition" from the dropdown menu. Choose "Mac OS Extended (Journaled) on the left.
  5. Hit the Options button under the partition table and choose "GUID Partition Table". You'll need this to make the drive bootable on a Mac. Hit the Apply button when you're done to format your drive (note: it will erase everything on the drive).
  6. Click on the "Restore" tab, choose the InstallESD.dmg file as the source and your flash drive as the destination. Hit the Apply button and it will create your bootable USB drive.
  7. Reboot into OS X and hold the option key when you hear the startup chime. You can boot into your DVD or flash drive from there.

Wednesday, November 23, 2011

iTunes notifications in the Mac's Dock


a secret preference setting built into OS X Lion that allows song notifications to pop up over the iTunes Dock icon. Here’s how to enable them:
First, quit iTunes if it’s already running. Fire up Terminal (from /Applications/Utilities/) and paste in the following command, then hit Return:

defaults write com.apple.dock itunes-notifications -bool TRUE;killall Dock
The first part of that command turns on the Dock’s ability to display iTunes notifications; the second part restarts your Dock. (That restart may take a couple of seconds.)
Now, relaunch iTunes, select a track, and press play. Down in the Dock, you’ll see a brief notification with the song’s name and artist. The notification will appear whenever the track changes, regardless of the app you’re currently using; it will then fade away on its own.
If you decide you don't like the notifications, you can get rid of them by issuing the same command, but replacing TRUE with FALSE.

Update: if Hyperdock is installed then you don't need this command because this preference pane takes care of this for you,

Friday, March 4, 2011

Macs can write to NTFS volumes now

I just recently bought a portable hard drive that was formatted with the NTFS filesystem and I was wondering if there was a way to write to the drive with my mac.  Well, not natively, Macs can only read such a filesystem, but fear not!  Go to MacGuy4.Us for the full solution.  Basically, you have to download two pieces of software (one if you already have Parallels Desktop installed).  For an added bonus, the new extension, NTFS 3G, you install will give the Disk Utility application the option to partition a drive with NTFS

Friday, January 7, 2011

Paused Printer

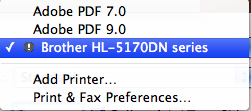
If you get an error saying the printer is paused you'll also get an exclamation point (!) next to the printer name, in this case it is Brother HL-5170DN series.  The next two screen shots will illustrate this.

Just click on continue as illustrated on the first screen shot.  If the printer can't resume, it'll tell you.  Just open the Print window and select Print & Fax Preferences and double-click Brother HL-5170DN series (the name may be shortened to fit inside the sidebar)


Thursday, October 28, 2010

Overheating iMac

 A few years back I did something silly even though I knew I should not do it.  I had a CRT iMac in my room that didn't have a seperate monitor switch and I wanted to get some sleep.  Because the display was too bright for me to get to sleep, I covered the iMac with a couple of towels and of course it overheated and would not turn back on.  I then searched Apple's knowledgebase and it told me to open up the unit and find a red PMU (Power Management Unit) button to reset the motherboard.  I did this and all was fine, thank God!